Next step! If you have made it this far you are totally on your way in the world of crochet!
Here is the next row:
Row 3: Ch 1, (counts as first Hdc), skip st and Hdc in each around. Join with sl st to top of Ch 1. (55 Hdc)
This is just like the last row except that you half double crochet (hdc), rather than double crochet. Here is how you half double crochet:
You yarn over the hook, place it in the loop, yarn over again, and pull through one loop, yarn over again, and pull it through ALL the loops. Here is the video:
Once you hdc in each stitch around be sure to join it to the chain 1 with a slip stitch.
ll post pics soon of my project. I have been having trouble uploading pics.
I know, I know...I should have posted this a couple of days ago. PLEASE forgive me. I don't know where my head has been. Seriously, I feel that I am striking out on a regular basis. Yesterday I put Belle down for a nap and accidentally shut our dog in the room with her. I couldn't figure out why she wasn't falling asleep and why my dog kept barking. The mystery wasn't solved until 45 minutes after putting her down for her nap when I decided to see what the issue was.
I had to continue with my spaciness today by forgetting to bring Belle's overnight bag when I dropped her off to my mom today. Where is my head??? My mom is the greatest ever because she insisted on going out to buy Belle clothes rather than having me head back home to get her bag. I really feel blessed to have such an amazing mom who is so supportive.
Okay, now time to work. The next stitch we are going to learn is the double crochet(dc). If you have mastered the single crochet, this one should be easy. Here are the instructions for the next row:
Row 2: Ch 2, (counts as first Dc), skip st and Dc in each Sc around. Join with sl st to top of Ch 2. (55 Dc)
Okay, you are first going to chain 2. When the pattern says "counts ad first DC," this means that you count this chain as one of the 55 DCs of the row. You are going to skip the stitch that your chain 2 is in (the same place that you joined from the previous row) and begin stitch double crochets in each sc from the previous row. If you look at the top of your previous round it will look like a bunch of sideways V's. You are going to be placing your hook under the V's. There is a hole underneath each V that you will put your hook into. Here is how you make a double crochet:
You yarn over first, THEN put your hook in the stitch from the previous row, yarn over and pull the yarn through one loop, yarn over pull through two loops, yarn over and pull through two more. Here is the video:
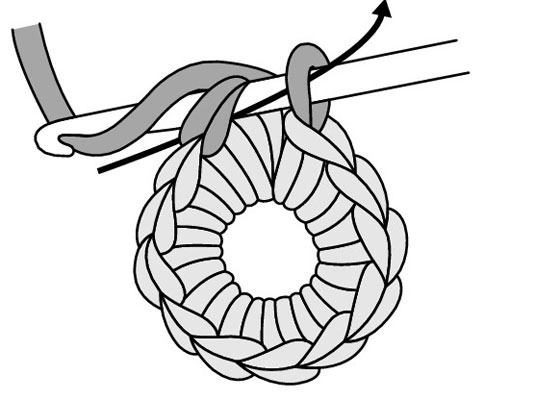
You finish off the round by make a slip stitch into the chain 2 that you started with. If you remember you do this by putting your hook through the top of this chain 2, yarn over and pull through all the loops on the hook.
You have completed Row 2 :-) I would show a picture of mine, but blogger isn't letting my upload pictures. BOO! Hopefully soon.
Here we go! Finally, it is time to start the Stitch-a-long I have been talking about. This post is going to be lengthy as we are going to go over making a slip-knot, chaining, single crochet, and how to read a pattern. Please be patient with yourself. I actually taught myself to crochet by reading instructions in a book. I didn't understand it and gave it up. A year later I tried again and it all of a sudden clicked! Crocheting comfortably and quickly take s a lot of practice--as does reading patterns. I still run into patterns that I have to read through a couple of times and start over on before it makes sense. I plan on putting video tutorials in this post to help you along. I thought about making my own videos, but why recreate the wheel. So many others have already created them for us. Okay, enough chatting, time to stitch!
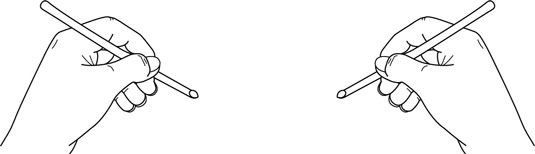
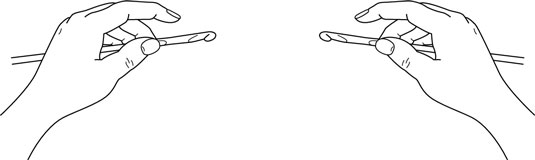
Holding the Hook: There are two common ways to hold a crochet hook.
The first is to hold the hook between your thumb and index finger like a pencil. This is called the underhand method:
The second is to hold the hook in an overhand manner, like a knife. This is how I prefer to hold my hook, but everyone is different. Do what feels most comfortable:
Getting Yarn onto Hook:
I figured the best way to show this was through a video. This woman explains how to put a slip knot onto your hook:
Holding the yarn: There has to be some tension when you are holding your yarn to keep it nice and tight to work with so it doesn't slip off the hook. I tend to hold the yarn in my left hand and wrap it around my index finger from back to front. Some people go all out and even wrap it around their pinky finger and then up to their index finger. Either way, make sure you hold the yarn in your left hand in a manner that keeps it nice and tight.
Making the Foundation Chain: Almost every crochet project begins with a foundation chain. The stitches look like a chain, therefore the name. You will build row upon row of stitches on this foundation chain.
First, make a slip knot. With the hook in front, take the yarn and run it over the hook from back to front. Hook this loop. Turn the hook so it faces downward, slide it through the original loop, and bring the yarn with it.
You have just made one chain stitch! Practice this technique until you can make them fluidly and evenly.
I found a video that helps demonstrate this, but I couldn't embed it, so check out this link.
READY TO GO!
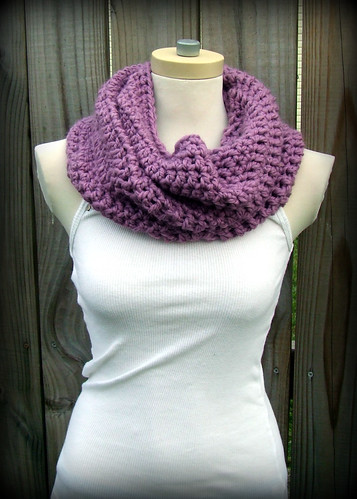
We are now going to begin crocheting the Convertible Cowl pattern from The Crimson Owl.
We have covered the basics of getting started. This is often the most difficult part of crocheting. Once you get comfortable with these steps you will be able to easily move through the others. So, here we go with the pattern:
Make sure you have your hook and your yarn. Make a slip stitch onto the hook to get the yarn on the hook. The first part of this pattern says:
"Ch 55 and join with a sl st into back of chain, being careful not to twist your chain."
Ch is short for "chain." Anytime you see Ch you will make that number of chains. In this case you are going to make 55. So, you have your slip knot on your hook. Now yarn over (short for yarn over is yo) the hook and pull the loop over and through the first loop. You will do this 55 times. You will have one long string of chains.
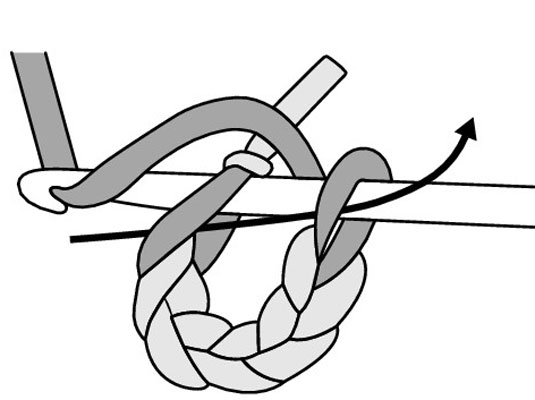
Joining with a slip stitch (sl st) means to connect the end of the long string of chains to the beginning. You will do this by putting your hook through one of the loops made by making the chains. You will put your hook under this loop, yarn over, and pull this loop through the two loops on the hook. Your piece will look like this:
Are we good? If you get this far you have probably completed the most difficult part of the piece. Now onto the next row. We will work through this row and then end for the night. This may very well take some of you ten minutes, and it may take others a good hour. Don't get discouraged. Remember that if this is new to you it may be a struggle to figure out exactly where to put the hook. Okay, Row 1:
"Row 1: Ch 1, (working in back of chain) Sc in same Ch as joining. Mark stitch. Sc in each chain around and join to marked stitch"
Ch1. This means to make 1 chain. Now, the next piece about working in the back loops of the chain can be tricky if you don't really know what you are looking at. If you are looking straight onto your row of chains, you will place the hook into this loop as you did when you joined the first rows together:
You will only go into this loop on the first row unless otherwise mentioned.
Sc stands for single crochet. This is a stitch that is slightly more in-depth than a chain. With a single crochet you put your hook into the right loop on your piece, yarn over the hook, pull the hooked yarn under the loop of your piece you just put the hook in, you will yarn over again, and pull through the two loops left on the hook. Yup, we need a video! Click here. The instructions say to put the sc in the same as the joining stitch. This means that your 1st single crochet on this round will be put right back into the same loop you made your joining stitch into. It says to mark you stitch here. I put a bobby pin right through this stitch. You mainly mark the stitch so you know right where you will end. You don't need to do this for every row, but it makes it easier with single crochets.
So, from this point on you will put single crochet stitches into the back loops of the chains you made. Therefore you will end up with 54 single crochets. When you reach your stitch marker you will join you row into the beginning of the row....remember how to do this? You will put your hook into your loop made from your first sc, yarn over the hook and pull the loop through two loops on the hook.
Okay, one row done. How did we do? I promise that it gets easier from here. Beginning any project is the most difficult. PLEASE PLEASE PLEASE ask questions if you are struggling to know what you are doing wrong or where to put the hook exactly. I was once where you are. It takes practice. A couple more days and we will get on to the next row....hopefully that gives you enough time to get this far and feel confident with your piece.
I know I just gave all of the details to get prepared for the stitch-along yesterday, but I realized that I need to clarify my hook information. I learned something new today about crochet--even after 7 years!
Apparently there is an N-13 hook that is 9.00mm and an N-15 hook that is 10.00mm. I want to make sure that everyone gets the hook that is 10.00mm. ALWAYS follow "mm" suggestions in patterns over the actual letter. I just found mine at Hobby Lobby. Sorry for the bad pic, but be sure to look in the upper right hand corner of the package for the size.
Oh, and I bought Lion Brand Jiffy yarn in Avocado. I am obsessed with green and I can't wait to see how this yarn looks all worked up!
Looks like there has been a positive response to the Convertible Cowl for our stitch-along! I am planning on heading out tomorrow to get some yarn, so I thought I would touch base with everyone about what to get in order to prepare!
This pattern calls for an "N" hook (N15) or an 10.00mm hook (same thing). Hook choice is EXTREMELY important because it determines the size of the stitches you make. Be sure to get an N15 hook and not an N13 hook. You can buy hooks at any craft store, or even at Meijer! The needle is larger, which is great for a beginner.
Second, this pattern calls for any bulky yarn or you can hold 2 strands together of medium weight. If this is your first go at crocheting I suggest buying the bulky yarn, rather than figuring out how to do things while holding 2 strands. Eventually, you can work up to this, but I would start with one strand.
So, how do I know if the yarn is bulky? Most yarns will say that they are bulky, but there is also a symbol printed on the labels that looks like this:
I will let you all know which yarn I buy tomorrow! Be sure to buy enough yarn to finish your piece. Lion Brand Jiffy Yarn is a great bulky size yarn to use and is $3.39 at Hobby Lobby. Each skein is 135 yards, and this pattern calls for 110 yards! Perfect! Be sure to always double check the number of ounces or yards needed for a pattern. Sometimes I just buy an extra skein for good measure. I hate nothing more than buying a skein of yarn to just barely run out by the end of the project and needing to run out to get another.
Another item this pattern calls for are yarn markers. I don't mess with these too often. When I really need them I tend to just use bobby pins to mark where my stitch is. If you prefer to use yarn markers you can buy them at any craft store. They are cheap and they look like this:
There you have it! Those are the basics! Go get those supplies and we'll be hookin' soon!
I have been researching all over for the right pattern for a stitch-along to teach the basics of crochet and to all work on together. I think that I have found the pattern, and I wanted to run it by everyone.
I have been wanting to make myself a cowl or one of those neck warmers. I figured, "what better time to make this than with a stitch along??" This pattern looks like something that works up quickly and incorporates a lot of the basic stitches, so I thought it was PERFECT! Let me know your thoughts! To see the pattern click here: Convertible Cowl
If everyone is in, then I will get started writing up the first blog post soon!
When I first started crocheting I had no clue about yarn, weight, fiber, etc. I just picked out what I thought the was the prettiest yarn and went on with it. Well, now that I am crocheting a ton more yarn has become an important thing for me to gain a bit of knowledge on. I get a lot of questions about yarn, so I figured a post about the yarns I use would be helpful. Below I will chat about the yarns I use and the pros and cons:
I Love This Yarn.
I really do love this yarn! This is a basic worsted weight yarn, but it has such a soft feel to it. Much less rough than the Red Heart brand. It has many colors and even some yarns with a sparkly thread running through it. I love sparkle! This yarn is great to work with and is probably my most used yarn. The downside? You can only buy it at Hobby Lobby. I LOVE Hobby Lobby, but sometimes in a pinch it's nice to run to Meijer (which is literally in my backyard) and pick some yarn up there. Not the case with this stuff.
Sugar 'n' Cream
This is my go-to yarn for anything I am going to make out of cotton. I can pretty much find this yarn anywhere. I like other cotton yarns, but I found this one to inevitably have the best price. I use this for many of my monkey hats. It gives them a bit more texture. Downside? They make a ton of colors, but sometimes I wish there was still more variety. They offer a lot of variegated skeins, but I tend to like solid colors best. I also tend to run into problems getting the colors I need. I use the brown in this yarn a lot and find that everyone else must like it too because it is often sold out when I am looking for it.
Vanna's Choice This yarn is awesome! It is a bit thicker than I Love This Yarn, but works up very similar. I love the colors in this yarn. There is a lot of variety and they just seem to be vibrant. I am using this yarn more and more, but I still can't get better bang for my buck than I Love This Yarn.
Bernat Satin I feel in love with this yarn when I first used it. I crocheted everything with this. It has a satin look to it that gives your project a really pretty sheen. This yarn looks beautiful! It offers some great colors too. Downside? Not overly available. I can find it an my local 5 & Dime and they carry WAY more colors than Michael's does. One other downside? I don't think this yarn wears well. Initially, projects look great, but after a lot of use they can get a bit fuzzy.
Lion Wool-Ease Thick & Quick This is the yarn I use when I need a good chunky yarn. This stuff works up quickly and has a real early look to it. I use this for some of my baby cocoons because it looks great in pictures. The downside? Cost. This yarn isn't cheap. Regularly $6.99 a skein at Michael's, so I often wait for it to go on sale AND use a coupon.
Red Heart Soft I have to admit, I am not a fan of many of the Red Heart yarns, but they really hit the mark with this one. This yarn is soft, shiny, and offers rich colors that make projects look awesome! This price isn't too bad either. I have been using this yarn more and more as I really like the colors that are offered
So, there are my thoughts on my favorite yarns! I am looking into how to buy yarn in bulk, but still haven't found a site that has made it worth my while. Any thoughts?
Let me know what your favorite yarns are and why? I am always curious to know what others use. I visit yarn stores, but can't bear to buy the amazing expensive yarns, but I am thinking I should splurge someday and make something sweet for Belle. We shall see! Hopefully this was helpful, otherwise, send me your questions you still might have and I will try to answer them.
This week I took a break from my normal routine of completing orders and made a new pattern. I usually feel guilty about working on something else when I have so many people waiting on orders, but I couldn't wait to try out this new pattern AND I was dying to get my hands hookin.' I had been eyeing this lion hat pattern for a long time and I finally bought it. I am SO happy with how it turned out. Anne, the lovely photographer that takes pics for me, passed along the picture today and it turned out great!! She said that the hat had her and the mother of this adorable baby laughing the entire time! Check it out:
On another exciting note, I finally made it to IKEA and purchased my long awaited shelf for my abundance of yarn. This sucker is HUGE, but it makes me so very happy! This offers me an insane amount of storage for my crochet materials. Yarn is really an annoying object to store. It gets tangled, knotted, and takes up a lot of space when you have 100+ skeins lying around. On top of the yarn issue, my hooks were everywhere. I will be the first person to say that I lack in the area of organization. I felt that this was the key to organizing my crocheting obsession, and in turn it would make my husband MUCH happier since he wasn't finding yarn all over the house.
DON'T YOU LOVE IT?? The munchkin in front is pretty darn cute too!
Things have continued to be hectic for me, but I have managed to stay on top of my life. I took a little vacay from the crochet business to focus on other areas of my life and I am ready to dive back in! Sorry for those still waiting for orders. I am getting to them as my life allows.
Okay, next post is going to be all about yarn! Brands, weight, where to buy, and my favorite! If you have any questions about yarn that you want me to answer send me your questions!
I am so sorry that this post will have few pics. My camera battery is currently dead and we left the charger in Indiana a couple of weeks ago. I SOOO want to share a new set of booties I made last week. Soon enough! Once I get that camera back I will be posting many pics!
One item I will be sure to post is the new organizing book shelf. I am planning on purchasing my new life saver this Saturday, which means I will make Paul put it together on Sunday when I get home from my shopping extravaganza! I can't wait!! I went out today and bought many of the canvas baskets I will need. I have already started organizing my yarn and it feels SO good. However, I can't believe how many times I have bought the same skein of yarn over and over because I didn't think I had it...now I have the same color in 4 skeins! Hopefully this new shelf will alleviate the problem of buying yarn when I don't need it.
Other than that, not much is major exciting over here. I am 25% of the way through my internship. Wow, that sounds so behind on where I want to be. I am really loving it, but hate how much time it consumes within my week. I miss my girl, and my house becomes a DISASTER. Someday when my internship and my schooling is all done I won't know what it is like to have my Tuesday nights free and not have to go into "work" three days a week. Keep praying me through!
Lastly, I wanted to share a picture of one of my hats. My mom gave this hat as a gift for a couple in their church who adopted this little peanut, Alyda. Could she be any cuter?!?! Her mom, Lea, shared this picture with me and I was thrilled to show it off.
Oh, and BTW, I am hoping to write a post about yarn soon. I have had a lot of yarn questions, so I am thinking about posting about my favorite yarn, most hated yarn, where I get my yarn, etc....stay tuned!
Not much to report this week.....life has been busy, Belle has been sick, and my hands have been workin'!
I need to take more pictures of things I have been making, but once I finish them they are off and in the mail. Needless to say, I have been making loads of owl hats, a cocoon, some newsboy hats, flowers, and tons of monkey hats!! It is crazy how many orders have been coming in and I am surprised at how quickly I have been turning them around. It feels good!
The problem with so many orders is that I tend to have loads and loads of yarn EVERYWHERE! Paul is a saint to put up with it. Belle somehow finds it all of the time and gets herself all wrapped up in it. I am in need of an intervention! So, here is my solution:
So many cubbies just waiting for baskets of yarn! This will be upstairs in our house. I am hoping to purchase this beauty in 2 weeks....I promise to post pics when done!
Oh, and let's have a linky party! It has been awhile and I want to see what everyone else has been up to!