
Holding the Hook:
There are two common ways to hold a crochet hook.
The first is to hold the hook between your thumb and index finger like a pencil. This is called the underhand method:
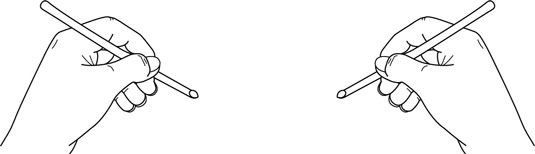
The second is to hold the hook in an overhand manner, like a knife. This is how I prefer to hold my hook, but everyone is different. Do what feels most comfortable: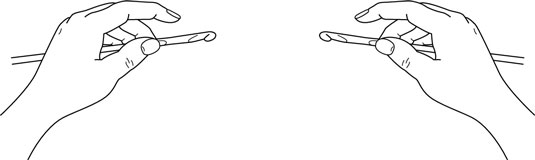
Getting Yarn onto Hook:
I figured the best way to show this was through a video. This woman explains how to put a slip knot onto your hook:
Holding the yarn:
There has to be some tension when you are holding your yarn to keep it nice and tight to work with so it doesn't slip off the hook. I tend to hold the yarn in my left hand and wrap it around my index finger from back to front. Some people go all out and even wrap it around their pinky finger and then up to their index finger. Either way, make sure you hold the yarn in your left hand in a manner that keeps it nice and tight.
Making the Foundation Chain:
Almost every crochet project begins with a foundation chain. The stitches look like a chain, therefore the name. You will build row upon row of stitches on this foundation chain.
First, make a slip knot. With the hook in front, take the yarn and run it over the hook from back to front. Hook this loop. Turn the hook so it faces downward, slide it through the original loop, and bring the yarn with it.
You have just made one chain stitch! Practice this technique until you can make them fluidly and evenly.
I found a video that helps demonstrate this, but I couldn't embed it, so check out this link.
READY TO GO!
We are now going to begin crocheting the Convertible Cowl pattern from The Crimson Owl.
We have covered the basics of getting started. This is often the most difficult part of crocheting. Once you get comfortable with these steps you will be able to easily move through the others. So, here we go with the pattern:
Make sure you have your hook and your yarn. Make a slip stitch onto the hook to get the yarn on the hook. The first part of this pattern says:
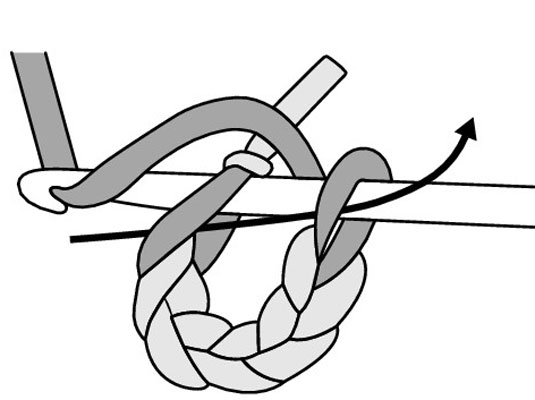
"Ch 55 and join with a sl st into back of chain, being careful not to twist your chain."
Ch is short for "chain." Anytime you see Ch you will make that number of chains. In this case you are going to make 55. So, you have your slip knot on your hook. Now yarn over (short for yarn over is yo) the hook and pull the loop over and through the first loop. You will do this 55 times. You will have one long string of chains.

Joining with a slip stitch (sl st) means to connect the end of the long string of chains to the beginning. You will do this by putting your hook through one of the loops made by making the chains. You will put your hook under this loop, yarn over, and pull this loop through the two loops on the hook. Your piece will look like this:

Are we good? If you get this far you have probably completed the most difficult part of the piece. Now onto the next row. We will work through this row and then end for the night. This may very well take some of you ten minutes, and it may take others a good hour. Don't get discouraged. Remember that if this is new to you it may be a struggle to figure out exactly where to put the hook. Okay, Row 1:
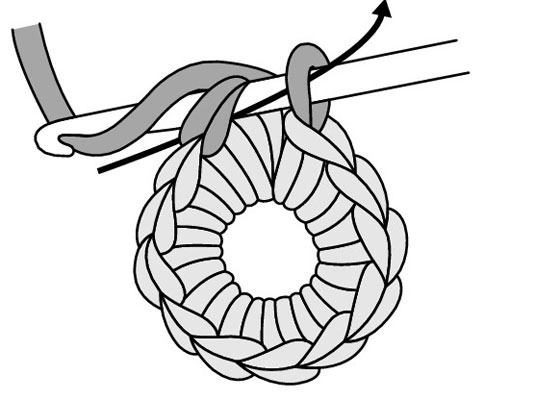
"Row 1: Ch 1, (working in back of chain) Sc in same Ch as joining. Mark stitch. Sc in each chain around and join to marked stitch"
Ch1. This means to make 1 chain. Now, the next piece about working in the back loops of the chain can be tricky if you don't really know what you are looking at. If you are looking straight onto your row of chains, you will place the hook into this loop as you did when you joined the first rows together:

You will only go into this loop on the first row unless otherwise mentioned.
Sc stands for single crochet. This is a stitch that is slightly more in-depth than a chain. With a single crochet you put your hook into the right loop on your piece, yarn over the hook, pull the hooked yarn under the loop of your piece you just put the hook in, you will yarn over again, and pull through the two loops left on the hook. Yup, we need a video! Click here. The instructions say to put the sc in the same as the joining stitch. This means that your 1st single crochet on this round will be put right back into the same loop you made your joining stitch into. It says to mark you stitch here. I put a bobby pin right through this stitch. You mainly mark the stitch so you know right where you will end. You don't need to do this for every row, but it makes it easier with single crochets.
So, from this point on you will put single crochet stitches into the back loops of the chains you made. Therefore you will end up with 54 single crochets. When you reach your stitch marker you will join you row into the beginning of the row....remember how to do this? You will put your hook into your loop made from your first sc, yarn over the hook and pull the loop through two loops on the hook.

Okay, one row done. How did we do? I promise that it gets easier from here. Beginning any project is the most difficult. PLEASE PLEASE PLEASE ask questions if you are struggling to know what you are doing wrong or where to put the hook exactly. I was once where you are. It takes practice. A couple more days and we will get on to the next row....hopefully that gives you enough time to get this far and feel confident with your piece.


Hi there! I am using a multi-colored, extra bulky yarn and it is hard to see the stitches clearly, if you know what I mean. Sometimes I am crocheting in the back loops but I don't think I am consistently. This yarn seems to hide my mistakes, so I'm hoping it will turn out okay. Any advice for working with this type of yarn? Thanks!
ReplyDeleteI'm so glad you're doing this stitch-along project with instructions. We need more crocheters to jump on the band wagon!
ReplyDeleteThanks for doing this! I recently learned how to crochet (I actually taught myself using your shell stitch beanie pattern, so thanks for that too!) and all of my friends have been wanting to learn, so I told them all about the stitch along and many are doing it.
ReplyDeleteI'm sorry but the Making the Foundation Chain video is awful because of the Point of View. I am watching her do it, and then having to try to reverse it in my head for me to do it, but it is just not computing!
ReplyDeleteHi, I know you posted this a long time ago, but I found the Crimson's Owls pattern and found your comment about the tutorial you were doing. I am now following this. I am a beginner. I have my chain done (I did it a little longer than 55 as I was finding that to be a little short even with the bulky yarn.)
ReplyDeleteMy problem is exactly how I connect the two ends. I know how to do a slip stitch, but I am having a hard time figuring out where I go in for the slip stitch and then after I have them connected which hole do I go in to start the sc. Also, do you know why the crimson owl only has you ch1 and 2 for a sc and dc respectively? I thought it was 2 and 3 ch. Thanks in advance for your help.
Hi there! I'm so excited I found your stitch-along series!! I've just decided I want to learn how to crochet, but am the type of person that needs to work toward completing something! I'm so excited that I've found this tutorial to learn the basics while being able to create something in the process!! :)
ReplyDelete